Showing posts with label recipe. Show all posts

Monday, July 18, 2011

~Recipe Monday–Too Much Chocolate Cake~

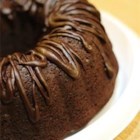
This cake is so easy to make and so delicious to eat!  I’ve made this cake twice and it’s been great every time.  What I like about this recipe is you can do do many different variations.  I’d like to try using white cake with white chocolate pudding and white chocolate chips. 

Too Much Chocolate Cake Recipe

Ingredients
  • 1 (18.25 ounce) package devil's food cake mix
  • 1 (5.9 ounce) package instant chocolate pudding mix
  • 1 cup sour cream
  • 1 cup vegetable oil
  • 4 eggs
  • 1/2 cup warm water
  • 2 cups semisweet chocolate chips
Directions
  1. Preheat oven to 350 degrees F (175 degrees C).
  2. In a large bowl, mix together the cake and pudding mixes, sour cream, oil, beaten eggs and water. Stir in the chocolate chips and pour batter into a well greased 12 cup bundt pan.
  3. Bake for 50 to 55 minutes, or until top is springy to the touch and a wooden toothpick inserted comes out clean. Cool cake thoroughly in pan at least an hour and a half before inverting onto a plate If desired, dust the cake with powdered sugar.

Recipe courtesy of www.allrecipes.com

Monday, July 11, 2011

~Recipe Monday: Strawberry Frozen Yogurt

This is the perfect recipe to make if you have strawberries that are very ripe and almost mushy.  Turn them into frozen yogurt!  The downside to this recipe is you need an ice cream machine.  It’s definitely worth a try if you have one.  Here is the recipe:

Ingredients
  • 2 cups fat-free plain yogurt
  • 2 cups pureed fresh strawberries
  • 1 (14 ounce) can fat free sweetened condensed milk
  • 1 cup fat-free milk
  • 3 teaspoons vanilla extract
Directions
  1. In a large bowl, combine all ingredients. Fill cylinder of ice cream freezer two-thirds full; freeze according to manufacturer's directions. Refrigerate remaining mixture until ready to freeze. Allow to ripen in ice cream freezer or firm up in refrigerator freezer 2-4 hours before serving. Remove from the freezer 30-45 minutes before serving.

Recipe Courtesy of www.allrecipes.com

Monday, April 11, 2011

Recipe Monday: Kettle Corn

Kettle Corn is one of my favorite “game day” snacks.  This salty and sweet snack goes great with baseball and soccer season.  It’s a great snack for kids and adults alike.  I tried this recipe out because I love buying kettle corn when we go see the Sounders play.  For those who aren’t from Seattle the Sounders are Seattle’s awesome Major League Soccer Team!  We are season ticket holders and have been since the first season.  We just started the third season.  It’s great to go to games however it’s not so great paying stadium prices for food and drinks.  Even though you can’t bring beer in to the stadium you can bring bottled beverages (still sealed) and food.  I decided to try out this kettle corn recipe since I’m always buying it at the stadium at $5 per bag.  After purchasing all the ingredients for this recipe I spent about $5 and can make kettle corn for each home game plus some!  I just saved a ton of money.  Here is the recipe if you are interested in making your own game day snack.

Prep Time: 5 minutes  |  Cook Time: 15 minutes | Yields about 5 servings

Ingredients
  • 1/4 cup vegetable oil
  • 1/4 cup white sugar
  • 1/2 cup unpopped popcorn kernels
    Directions

    Heat the vegetable oil in a large pot over medium heat. Once hot, stir in the sugar and popcorn. Cover, and shake the pot constantly to keep the sugar from burning. Once the popping has slowed to once every 2 to 3 seconds, remove the pot from the heat and continue to shake for a few minutes until the popping has stopped. Pour into a large bowl, and allow to cool, stirring occasionally to break up large clumps.

    *Note:  I like to add some sea salt to my popcorn once finished.  After the popcorn cools down fill a bag full and pack it up to take to the game. 

    For a direct link to this recipe click HERE.

    Monday, April 4, 2011

    Recipe Monday: Crumb-Coated Chicken Thighs

    I was looking for an easy recipe to cook dinner the other day and came across this one on All Recipes.  Not only was it super easy to make but I had all the ingredients on hand. 

    Here is the recipe if you are interested in making some quick and easy chicken!  I imagine you could use any piece of the chicken but I followed the recipe and used thighs.  Make sure to remove the skin prior to coating!  This way you can eat the yummy topping unless you can afford the calories/fat in eating the skin.

    Prep Time: 10 minutes | Cook Time: 35-45 minutes |  Yields 4 servings

    Ingredients
    • 1/4 cup dry bread crumbs
    • 1 teaspoon salt
    • 1 teaspoon ground cumin
    • 1 teaspoon paprika
    • 1 teaspoon chili powder
    • 1 teaspoon curry powder
    • 1/4 teaspoon pepper
    • 8 (5 ounce) chicken thighs, skin removed
    • Directions
      In a large resealable plastic bag, combine the first seven ingredients. Add chicken, a few pieces at a time, and shake to coat. Place on a baking sheet coated with nonstick cooking spray. Bake, uncovered, at 400 degrees F for 20 minutes. Turn chicken pieces; bake 15-20 minutes longer or until a meat thermometer reads 180 degrees F.

      For a direct link to this recipe click HERE

    Monday, November 16, 2009

    ~Recipe Monday – Pumpkin Flax Quickbread

    Instead of pumpkin pie why not change it up and make some pumpkin bread?  Why not try this healthy flax quickbread from Allrecipes?  I bet this not only tastes delicious but also smells wonderful while baking. 

    Pumpkin Flax Quickbread

    Prep time: 10 minutes

    Cook time: 1 hr 10 minutes

    Ingredients
    • 2 tablespoons flax seed meal
    • 6 tablespoons water
    • 1 1/2 cups sugar
    • 1 cup canned pumpkin puree
    • 1/2 cup applesauce
    • 1 1/3 cups all-purpose flour
    • 1/3 cup whole wheat pastry flour
    • 1 teaspoon baking soda
    • 1 teaspoon ground cinnamon
    • 3/4 teaspoon salt
    • 1/2 teaspoon baking powder
    • 1/2 teaspoon ground nutmeg
    • 1/4 teaspoon ground cloves
    Directions
    1. Preheat oven to 350 degrees F (175 degrees C). Lightly grease one 9x5 inch loaf pan.
    2. Whisk together flax seed meal and water. Mix in sugar, pumpkin and apple sauce.
    3. In a large bowl, stir together all-purpose flour, whole wheat flour, baking soda, cinnamon, salt, baking powder, nutmeg, and cloves. Add flour mixture to pumpkin mixture; stir until smooth. Pour batter into prepared pan.
    4. Bake in preheated oven for 65 to 70 minutes, until a toothpick inserted into center of the loaf comes out clean.

    Monday, November 9, 2009

    ~Recipe Monday – Oven Pot Roast~

    With the fall season here and in full force I love roasting a  delicious cut of meat in the oven.  Nothing is better then smelling it roast in the oven.  It is such an easy dinner to prepare and allows me extra time to make greeting cards, gotta love that!  Recently I found this recipe on Allrecipes and am dying to try it out.  All I have to do is defrost my roast! 

    Oven Pot Roast 

    Prep Time: 15 minutes

    Cook Time: 3 hours (depending on how big your roast is)

    Ingredients
    • 1/2 cup all-purpose flour
    • ground black pepper to taste
    • 3 1/2 pounds rump roast
    • 1/4 cup butter
    • 1/2 (1 ounce) envelope dry onion soup mix
    • 1 (10.75 ounce) can condensed cream of mushroom soup
    • 1/2 cup dry vermouth
    Directions
    1. Preheat oven to 325 degrees F (165 degrees C).
    2. In a large mixing bowl, combine the flour and black pepper to taste. Dredge the rump roast in the flour and cover evenly. Shake off excess.
    3. In a large pot over medium/high heat, melt the butter and brown the roast on all sides. Place in a 4 quart casserole dish with lid.
    4. In a small bowl, combine the soup mix, mushroom soup, and vermouth or white wine; pour over roast.
    5. Cover and bake in preheated oven for 3 hours or until desired doneness.

    Roast some potatoes and carrots in the oven and viola…You have a superb fall meal!  Happy Roasting!

    Tuesday, October 27, 2009

    ~Pumpkin Carving 101 + Roasted Pumpkin Seeds~

    IMG_6129 We carved pumpkins this past Sunday and I wanted toIMG_6123 share the photos of our spooky creations.  Mike and I have never carved pumpkins together so it was   something we had to do!  Naturally after you carve pumpkins you save the seeds and roast them!  It’s a little work but totally worth it.  Mike had never eaten a pumpkin seed so that gave me another reason to make them.IMG_6122

     The recipe I used was from my favorite online recipe web site, www.Allrecipes.com.  Here is the IMG_6126link to the pumpkin seed recipe: Spiced Pumpkin Seeds

    And…here is a photo of our pumpkin seeds roasting in the oven!  They smelled delicious while baking, it really feels like fall when you are roasting seeds and carving pumpkins!   

    And to end this post here are our pumpkins all lit up looking spooky on the patio.  The right pumpkin is mine and the left one is Mike’s.  It’s hard to see in this photo but Mike’s pumpkin has ears.  Looking forward to the weekend, Halloween will be a blast this year!IMG_6132

    Thursday, March 19, 2009

    ~Flax Banana Bread Recipe~

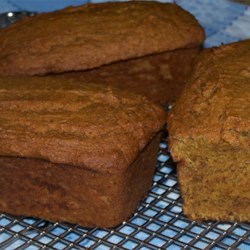
    Ever get tired of making the same banana bread recipe?  I had 2 lonely bananas that were getting a little too ripe on my counter.  I didn’t want to use my typical banana bread recipe so I went searching on Prevention Magazine’s
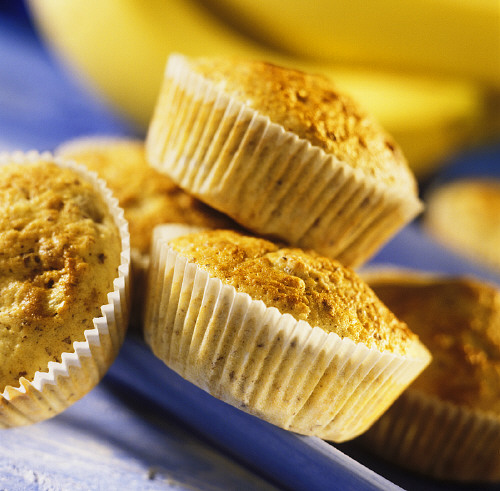
 website (www.prevention.com) and found this flax banana bread recipe.  Not only is this a healthy recipe but it tastes delicious too!  Next time I make this I will be adding walnuts.  Also instead of making bread I used this recipe to make muffins, still bake at 350°F but lowered the baking time to 20 minutes.  

    Ingredients

    Directions

    1.  Preheat the oven to 350°F. Coat a nonstick 8- x 4-inch loaf pan with cooking spray.

    2.  In a large bowl, combine the sugar, buttermilk, egg substitute, and oil. Whisk until smooth.

    3.  In a medium bowl, combine the all-purpose flour, whole-wheat flour, flaxseed, baking powder, baking soda, and salt. Whisk to mix.

    4.  Add to the liquid ingredients, and stir just until blended; do not over mix. Add the bananas and stir to mix.

    5.  Pour into the prepared pan. Bake for 40 to 50 minutes, or until a knife inserted in the center comes out clean. Remove the pan to a wire rack, and let the bread cool slightly. While it is still slightly warm, turn the bread out of the pan.

    *Recipe Tips*

    For best results, choose very ripe bananas, place them in a blender or food processor, and puree until smooth. Ground flaxseed is sold in natural food stores. Store any unused flaxseed in a tightly sealed container in the refrigerator or freezer.

    *Recipe courtesy of www.prevention.com*

    Tuesday, November 18, 2008

    ~Honey-Garlic Glazed Meatball Recipe~

    These meatballs are quick and easy to prepare not to mention make a great snack, appetizer, or meal! 

    Honey-Garlic Glazed Meatballs

    Ingredients:

    • 2 eggs
    • 3/4 cup milk
    • 1 cup dry bread crumbs
    • 1/2 cup finely chopped onion
    • 2 teaspoons salt
    • 2 pounds ground beef
    • 4 garlic cloves, minced
    • 1 tablespoon butter
    • 3/4 cup ketchup
    • 1/2 cup honey
    • 3 tablespoons soy sauce

    • Directions:
    • In a large bowl combine eggs and milk. Add the bread crumbs, onion and salt. Crumble beef over mixture and mix well. Shape into 1-in. balls. Place in two greased 15-in. x 10-in. x 1-in. baking pans. Bake, uncovered, at 400 degrees F for 12-15 minutes or until meat is no longer pink.

    • Meanwhile, in a large saucepan, saute garlic in butter until tender. Stir in the ketchup, honey and soy sauce. Bring to a boil. Reduce heat; cover and simmer for 5 minutes. Drain meatballs; add to sauce. Carefully stir to evenly coat. Cook for 5-10 minutes.

    • *Recipe courtesy of www.allrecipes.com*